Information Center
Training List Step by Step
Please Note!
This tutorial uses information from the Training table in HRT. If you normally do not have access to training data you can not follow this tutorial on your own computer. It also assumes some familiarity with training data as well as SQL knowledge.The aim of this tutorial is to create a report that can list people that have followed a specific course but not followed another specific course. This report will give the answer to questions like "Who has followed Java 1 but not Java 2?".
Step 1. Create a new Report
Our first step is to create a new report. Proceed as you were shown in the first tutorial on the main documentation page. Let's call this report "Training List".
Step 2. Select the Tables we need
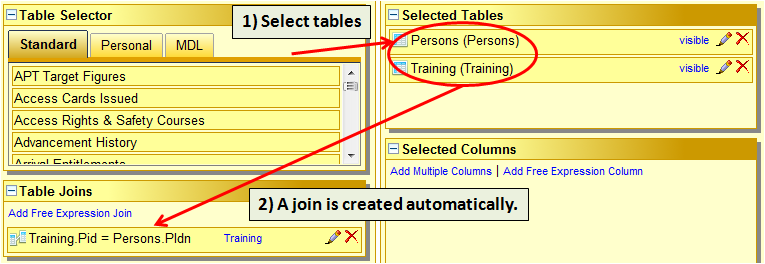
As in the previous tutorial, select the required tables by dragging them from the table selector to the list of selected tables. For this report we need two tables. First we need the "Persons" table just as in the previous report. We also require the "Training" (labelled "Training Enlisted For" in the table selector) table.
Once you have selected more than one table an entry will show up in the list of table joins. The database needs to know how the two tables relate to each other in order to retrieve the data. Information Center automatically creates a join between both tables linking them by using the Person Id.
If you add other tables and a join is not created automatically, please do not forget to create a join manually by dragging the columns to be joined onto the "Table Joins" component. In this specific example, this is not necessary.
Step 3. Select the data
Just as in the previous tutorial, we need to select the columns we want to extract. Let's select Persons.FullName from the Persons table and Training.Title, Training.Year and Training.EdhDoc from the Training table using the "Quick Column Selector" which is accessible using the blue link "Add Multiple Columns" in the list of selected columns.
Step 4 part 1. Add the Filters (Conditions)
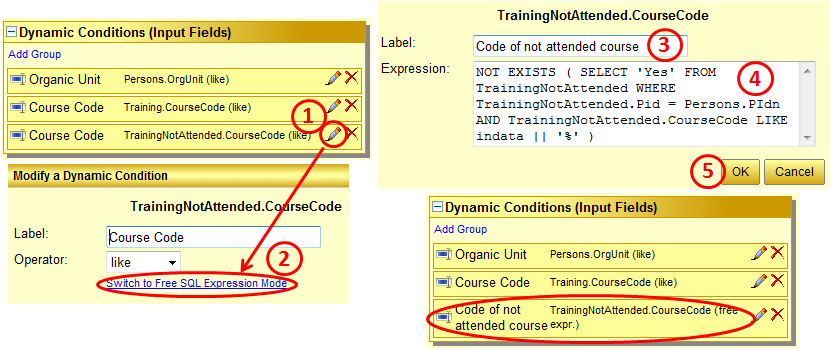
So, what do we want to search for? The course code of course and perhaps the organic unit of the attendees. So, let's add those conditions. Proceed as described in the main tutorial and drag the columns Persons.OrgUnit (Organic Unit) and Training.CourseCode (Course Code) from the column selector to the list of dynamic conditions. By default, the used operator will be set to "LIKE" so that there is nothing more to do in this step.
Your conditions should now look like in the following screenshot:
At this point you can already execute this report if you so wish. It will however not yet answer the question who has followed course A but not course B. To find that answer, we have to continue with the next step.
Step 4 part 2. Add the "not" Filter (Conditions)
We said that we wanted to make a report that showed people that had not attended a course a specific course, too. In order to do this it is necessary to apply a second criteria on the course code. To apply multiple dynamic conditions on the same column, we need to include the same table twice into our report.
Go to the table selector and drag the Training table to the list of selected tables once more. When you have added it you will see that it has now been given the name "Training1". Two tables can not have the same name so when you add the same table twice, Information Center will give it an "alias". You can change the alias by clicking on the
icon to the right. We change the alias of the table to "TrainingNotAttended" to make it a bit more clear what this table is used for.
Now we need to do two more manipulations. First of all, we intend to use this second copy of the Training table for filtering only. We do not intend to show any data from it. In order to do this we must make it invisible. By default all tables are "Visible" (this status is shown to the right of the table names). Click on the word "visible" for the TrainingNotAttended table and it will switch to "hidden".
Information Center also automatically added a join between the Persons table and the second Training table. Although this is normally correct, in this particular case we do not want it. Remove it by clicking on the
icon to the right of the join involving TrainingNotAttended and Persons.
Now we are ready to add the additional condition itself.
Start by adding a Dynamic Condition as you did earlier for the first two conditions. Drag the column "Course Code" from the table "TrainingNotAttended" to the list of dynamic conditions. Now, we want to enter our own specific SQL expression here in order to achieve the NOT part of the query. Do this by editing the condition and switching it to "Free SQL Expression Mode". Do not forget to also change the label so that it is obvious what to put in the different search fields once the report is executed.
We want to write a condition that excludes everyone that has actually followed the course that was entered in the form for this field. For this tutorial we have chosen the following expression:
not exists ( select 'Yes' from TrainingNotAttended where TrainingNotAttended.Pid = Persons.PIdn and TrainingNotAttended.CourseCode like indata || '%' )
This is a normal SQL expression with one exception. Notice the word "indata" in the expression. This is a place holder where the text that the user entered in the form at the time of execution will be injected. Notice also that you can refer to any of the columns in the tables you have added to your report.
Your report is now executable.
Step 5. Enhance the Request
There is one problem with this report. The Training table contains all training registered at CERN regardless of whether the participant has actually followed the course, is still attending or waiting for it or whether the course was even cancelled.
Below, we will add a static condition in order to limit the shown results to those course that have actually been attended.
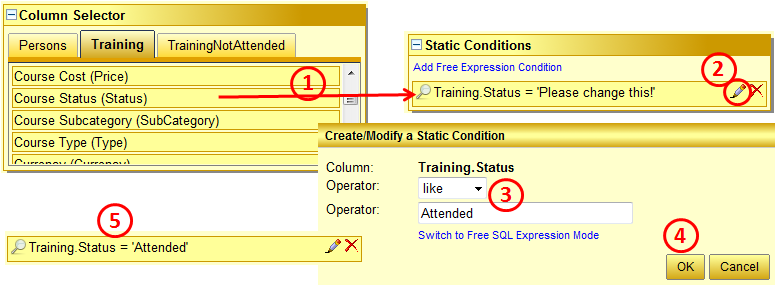
In the Training table there is a column called Status. This column contains the status (Attended, Waiting, Cancelled, etc) of the course. We can add a static condition in our report that ensures that only courses that have been attended are considered.
Drag the "Status" column from the column selector to the list of static conditions and then edit it by clicking the pencil icon to its right to make it look like in the following screenshot:
The first half of the problem is now solved. There is a condition on the course we want to check whether it has not been attended. In the underlying free SQL expression, we would like to make sure that only attended courses are considered, too.
Simply click on the edit icon next to the dynamic condition on the column "TrainingNotAttended.CourseCode" and add the same condition to the existing SQL expression. When you have finished it should look like this:
not exists ( select 'Yes' from TrainingNotAttended where TrainingNotAttended.Pid = Persons.PIdn and TrainingNotAttended.CourseCode like indata || '%' and TrainingNotAttended.Status like 'Attended%')
Do not forget to add the percent at the end of 'Attended' since it is a like expression. For simple dynamic and static expressions, Information Center will add this automatically but for free SQL expressions you have to remember every detail yourself.
You might wonder why we need a like expression, this is simply because the status field contains more text, for example 'Attended (100%)', etc.
This of course leads us to a further problem. What if someone attended to only 20%? Should the report display this person? Well, there is a Percentage field in the Training table as well. So you could add a condition on this field to further enhance this report, but as far as this Tutorial is concerned, this is as far as we will go. Go ahead and try out your report.


